Centrifuges
We have two centrifuges in the lab. The Avanti J26XP and the Optima XE. Spin fast and make sure the centrifuge tubes are balanced!
Contents
Section titled “Contents”1. Optima XE
Section titled “1. Optima XE”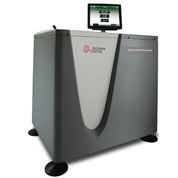 The Optima XE is the ultracentrifuge. The max speed is 90000 rpm!
- You can find the instructional video
- This is intense, please sit down. Make yourself a latte.
1.1 Rotors
Section titled “1.1 Rotors”The rotor for the Optima XE is Ti-45 (titanium 45000 rpm).
- The rotors will be stored in the cold room (4C) to keep our experiments happy
- Store the rotor in it’s blue bag for longevity.
- To clean the rotor, remove the o-ring on the lid and clean out gunk monthly. The lid is not titanium and will corrode if not cleaned. Replace the o-ring and add a little vacuum grease.
- If you clean the rotor with water or alcohol turn it upside down to dry.
1.2 General operation
Section titled “1.2 General operation”- When you enter the lab in the morning the Optima will be turned off and the lid will be closed.
- Turn the Optima on.
- Initiate vacuum seal to bring temperature to operating level.
- If running a sample:
- Place samples in centrifuge tubes that can withstand appropriate force.
- Balance tubes so the weight is distributed equally on the rotor.
- Place rotor onto the motor and screw on lid.
- Close the lid of the Optima and set your parameters i.e. Speed, Temperature, Time.
- Press Start.
- You will hear the vacuum pump turn on.
- As the rotor approaches the speed you want, the pressure in the centrifuge drops holding the rotor in place
- At the end of the day, when no one is running a sample raise the temperature to 28C and initiate the vacuum.
- After 30 minutes shut the machine off. This is to ensure no condensation develops in the machine and for the duration of the vacuum pumps.
1.3 Common problems
Section titled “1.3 Common problems”- Use bottles with the proper g-force.
- If there are fracture lines in the bottles, they need to be replaced.
- If a sample breaks in the centrifuge, the sample may leak into the vacuum pump
- The vacuum will not seal properly if this happens.
- Call maintenance.
1.4 Maintenance
Section titled “1.4 Maintenance”- Manual
- Cleaning:
- Daily
- Wipe the inside of machine down.
- Clean bottles
- Monthly
- Remove o-ring on rotor lid and clean gunk from the groove. Re-grease o-ring and replace.
- Annually or if worn looking
- Replace barcode reader
- See Manual
- Replace barcode reader
- Daily
- Installation date 9/06/2012
- Service: Phil Walden, Bioniquest Lab Services (third-party; repaired the J-26XP in 2026), philw@bioniquest.com
2. Avanti J-26XP
Section titled “2. Avanti J-26XP”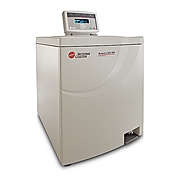 The Avanti has a max speed of 26000 rpm
- The video for this is less
2.1 Rotors
Section titled “2.1 Rotors”The rotors for the Avanti J-26 are the JLA 16.250 and the JLA 8.1
- These rotors will be stored in the cold room.
- Store them in their blue bags.
- To clean the rotor, remove the o-ring on the lid and clean out gunk monthly. The lid is not titanium and will corrode if not cleaned. Replace the o-ring and add a little vacuum grease.
- If you clean the rotor with water or alcohol turn it upside down to dry.
- DO NOT immerse the JLA 8.1 in water. IT WILL NEVER DRY!!
- Please wipe it down with a damp cloth or something.
2.2 General operation
Section titled “2.2 General operation”- When you enter the lab in the morning the Avanti will be turned off and the lid will be open.
- Turn on the Avanti and close the lid.
- Set temperature to 4C and allow time to equilibrate.
- If running a sample:
- Place sample in centrifuge bottles and distribute them evenly in the rotor.
- Place loaded rotor onto motor and close lid. Make sure to align the pins on rotor to set in between the baffles on the motor.
- Set parameters i.e. Time, Temperature, Speed.
- Press start.
- At the end of the day when no one is running a sample, leave the lid open and turn off the machine
- This will ensure that the condensate evaporates.
2.3 Common problems
Section titled “2.3 Common problems”- The canisters on the JLA 8.1 can be removed from the rotor. Every few years the stress relievers (fancy o-rings) will need to be replaced.
- The canisters themselves will need to be replaced on June 1, 2020. They have the expiration date written on them.
- Use bottles that can withstand the amount of g’s you are applying.
- The rotors on the Avanti have pins that sit between two baffles on the motor.
- Make sure these pins are between the baffles or else the rotor won’t spin with the motor.
- These pins may break off ($500 ea!) and the baffles may where down.
- Please align the pins. They are $500 each.
2.4 Maintenance
Section titled “2.4 Maintenance”- The Manual
- Cleaning:
- Daily
- Wipe down inside of machine
- Monthly
- Clean grime in the groove of rotor lids. Re-grease o-rings and replace.
- Annually
- I’ll think of something absurd.
- Daily
- Installation date 9/06/2012
- Service: Phil Walden, Bioniquest Lab Services, philw@bioniquest.com
Contacts checked October 2026.
3. Bench top centrifuges
Section titled “3. Bench top centrifuges”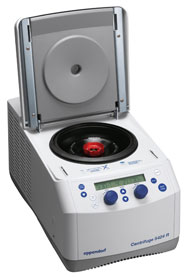 We have two benchtop centrifuges in the lab. One in Instrument Row and one in the FPLC refrigerator at 4C.
3.1 General protocol
Section titled “3.1 General protocol”- Set parameters: temperature, time, and speed
- Balance samples in Eppendorf tubes
- Place Eppendorf tubes on opposites sides of the rotor to balance
- Place lid on rotor (optional)
- Spin real fast
3.2 Maintenance
Section titled “3.2 Maintenance”- Manual
- Kaya Florczak, Account Manager, Eppendorf, florczak.k@eppendorf.com
Contacts checked October 2026.
4. Placing the rotors on the centrifuges
Section titled “4. Placing the rotors on the centrifuges”Rotor pins can be worn down quickly and need repair from improper placement on the centrifuge. Please see attached file for proper rotor placement. Look up proper rotor placement in the user guide if still unsure.
placing_the_rotor_on_the_centrifuge.docx
4.1 Beckman rotor repair
Section titled “4.1 Beckman rotor repair”If the rotor pins do wear down and need repair, here’s the contact information to coordinate having the Rotor sent back to the Beckman Repair Shop.
- Beckman Coulter rotor repair; the old contact (Robert Tarrh) is not confirmed since the old wiki; check with the lab manager.
The repairs usually take 2 weeks after Rotor and P.O are received by Beckman.