Protein SDS-PAGE
SDS-PAGE (Polyacrylamide gel electrophoresis) is used to denature and separate proteins by size and charge. Smaller/shorter molecules move faster and migrate further than longer ones. SDS helps to denature the sample so that proteins no longer have any secondary, tertiary or quaternary structure (i.e. we want them to retain only their primary amino acid structure on the gel). This helps to fractionate proteins of different shapes on the same gel.
Contents
Section titled “Contents”- Additional Resources
- Gel Percentage Reference
- Pouring the Gel
- Running the Gel
- Visualizing the Gel
- Protein Ladders
1. Additional Resources
Section titled “1. Additional Resources”- Please read Chapter 19.8 of our Molecular Cloning book
- Take a look at CSH protocol online.
- Wikipedia has some practical considerations when running SDS-PAGE gels.
- Read the manual to learn how to use the casting system.
2. Gel Percentage Reference
Section titled “2. Gel Percentage Reference”The gel percentage refers to percent acrylamide in the gel. Higher numbers indicate more polyarylamide cross-linking and a smaller gel pore size. Thus, small proteins are resolved on high percentage gels, while large proteins will be run on lower percentage gels.
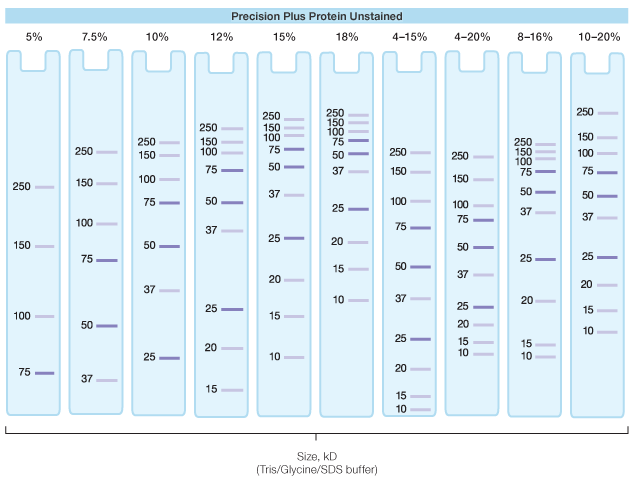 SDS-PAGE percentage separation quick-reference, courtesy of Bio-Rad. The last four columns in the figure above are gradient gels and must be purchased, either from the Gel Company (dead link) or Lonza.
3. Pouring the Gel
Section titled “3. Pouring the Gel”We routinely pour two-layer stacking, discontinuous gels. The lower layer is called a resolving layer and will dependent on the size of your protein(s) of interest. It is poured first. The top layer will generally be a 5% polyacrylamide focusing layer and will be what you insert your comb into. When working on a protein purification, its convenient to pour several gels simultaneously and store them wrapped in a wet paper towel at 4oC. They can be stored for months or until the gels begin to dry out.
3.1 Recipe for ~7-8 gels
Section titled “3.1 Recipe for ~7-8 gels”| Resolving Layer | 8% | 10% | 12% | 15% | 18% |
|---|---|---|---|---|---|
| H2O (ml) | 26.5 | 24 | 21.5 | 17.75 | 14 |
| 1.5M Tris pH 8.8 (ml) | 12.5 | 12.5 | 12.5 | 12.5 | 12.5 |
| 10% SDS (ml) | 0.5 | 0.5 | 0.5 | 0.5 | 0.5 |
| 40% Acryl (ml) | 10 | 12.5 | 15 | 18.75 | 22.5 |
| 10% APS (ml) | 0.5 | 0.5 | 0.5 | 0.5 | 0.5 |
| TEMED (ul) | 20 | 20 | 20 | 20 | 20 |
| Stacking Layer | 5% |
|---|---|
| H2O | 14.6 ml |
| 1M Tris pH 6.8 | 2.5 ml |
| 10% SDS | 0.2 ml |
| 40% Acryl | 2.5 ml |
| 10% APS | 0.2 ml |
| TEMED | 20 ul |
3.2 Procedure
Section titled “3.2 Procedure”Casting the resolving layer:
- Prepare the glass plates, combs and casting station before you combine any chemicals. Read the manual to learn how to use the casting system.
- Adding a 1000 mL pipette tip between the casting station clip will help keep the gel from leaking (it can still happen though).
- Combine H2O, Tris, SDS and Acrylamide in a 50 mL disposable falcon tube and invert several times or vortex to mix thoroughly.
- Add APS and TEMED, invert several times and use a Pipette-Aid to cast the resolving layer, up to the bottom of the green line from the casting station which is about an inch free at the top. Polymerization initiates as soon as you add APS & TEMED so you only have a few minutes before the gel solidifies.
- Pour ~0.5ml of isopropanol or butanol gently on top of the resolving layer. This should pop all air bubbles and provide for a smooth boundary between the focusing and resolving gel layers.
- Wait ~20-30 minutes for the resolving layer to solidify.
Casting the focusing layer:
- Gently remove the isopronanol with the edge of a Kim-Wipe (inverting the casting station over the sink with a kim-wipe works too to remove the isopropanol).
- Some leaking from the gel is still usable up to the top of the green casting doors.
- Combine H2O, Tris, SDS and Acrylamide in a falcon tube and mix.
- Add APS and TEMED, mix and fill the gel to the top with the acrylamide mixture.
- Insert the comb and let the gel polymerize.
- Wait ~15-20 minutes for the focusing layer to solidify.
- Wrap the gel plates with a damp paper towel and place the gel stack into a plastic bag or wrapped by cling film.
- Label the bag or cling film with initials, date, and gel type.
4. Running the Gel
Section titled “4. Running the Gel”- Place the gel in the running tank and fill the tank with 1x TGS to the fill line.
- Boil your protein sample with 4x SDS-PAGE loading dye to denature the proteins.
- I recommend you spin them down at max rcf for a few seconds to remove aggregates.
- Load the gel using gel-loading tips.
- Run the gels at constant voltage. Running the gels too fast will cause heating and melting of the polyacrylamide. This will lead to smeary gels.
- Bio-Rad gels: ~200V max recommended
- You will see a wall of white bubbles. This is caused by foaming of the SDS as gas bubbles are released at the two electrodes.
5. Visualizing the Gel
Section titled “5. Visualizing the Gel”We will use SafeStain from Invitrogen. Once the gel is finished, remove it gently from its casing and place in a gel staining basket. Add enough SafeStain to cover the gel and then microwave it for 40 seconds. This opens the pores of the gel and lets the stain seep in. It also keeps Ilya happy, because fast results are good results. Allow the gel to stain on the belly dancer or orbital shaker (12-30 rpm). Destain with water overnight (16-20 hours).
Photograph and print your gel using the InGenius Darkroom Cabinet.
6. Protein Ladders
Section titled “6. Protein Ladders”Coming soon